An amazingly fancy appetizer that is sure to impress your guests! Baked clams has been a favorite of mine since I was a little girl. I remember my mom making them for special occasions / family parties. I'm excited to have my own recipe to share with you all!
Time: 1 hour
Ingredients:
1 dozen cherry stone clams (can use little necks)
1 cup panko
2 tablespoons melted butter
1 teaspoon chili powder
1 teaspoon garlic powder
1 teaspoon dried parsley
salt & pepper to taste
1/2 cup white wine
1 teaspoon dried oregano
juice of 1/2 a lemon
Recipe:
Scrub the clams under cold water to remove any sand.
In a large pan, bring the wine to a boil, then add the clams & cover the pan. Reduce the heat to a simmer.
Allow the clams to cook just enough to open up, about 7 minutes.
Remove the clams from the heat, remove the meat from the shells, and set the shells aside.
Use a knife to chop the meat into smaller chunks.
Peheat oven to 450.
Transfer the meat to a mixing bowl & add in all the other ingredients above. Mix to combine. Tip: use whatever you feel like using to spice this up! I added chopped Jalapeño slices for a little kick.
Fill the half shells with the mixture, then place them on a cookie sheet & bake for 10 mins or until the filling is golden brown. Voila!
Oh em gee... probably my favorite dessert ever! And I finally built up the confidence to try making it. The process for macarons is tedious because you need to be really precise & careful at every stage or you'll mess them up. But, if you do follow the process correctly, you'll end up being so happy with the results! Here's my take, enjoy!
Time: 1 hour total for about 25-30 macarons
Ingredients:
1 cup powdered sugar
3/4 cup almond flour, finely ground
1/4 cup granulated sugar
3 medium egg whites (or 2 large)
food coloring if desired
Recipe:
Combine the powdered sugar & almond flour then sift them together into a bowl. Set the mixture aside.
Mix the egg whites in a mixer on medium speed for 30 seconds.
Increase the speed to high then add in the sugar, half at a time. If you are using food coloring, pour that in now. I used 3-4 drops of color for mine.
Leave the mixer on high until you see stiff peaks start forming. Stop the mixer.
The wet ingredients are ready when you can take some into a spatula & the batter falls off in the consistency of lava.
Slowly, half at a time, mix in the dry ingredients. Fold them in slowly, careful not to over mix. After half the mixture is incorporated, add in the second half and do the same folding.
Once the mixture is combined, you can scoop it into a piping bag.
Pipe the batter into a cookie sheet lined with parchment paper, using a macaron template (I got mine on Amazon with a silicon piping bag) or just average about a quarter size for each round. You want to give them enough room to expand slightly as the batter settles.
Once all of the rounds are piped out, lift the cookie sheet & drop it down hard, so it bangs on the countertop a few times, turning it on each bang. This will get rid of any excess air bubbles.
Leave the macarons out for 15-30 minutes until a slight shell appears over them. To test this, gently press your finger on one of them and if no batter comes off onto your finger, they're ready to go!
Bake on 300 for about 12-15 minutes or until the cookies are hard but not browned.
Allow the macarons to cool for 20 minutes before moving them to a cooling rack. Then, let them cool completely on a cooling rack before filling them.
For the filling, I made salted caramel, dark chocolate ganache, cream cheese icing, and a pistachio filling made by boiling butter, half & half, ground pistachios, and confectioners sugar.
One of my favorite movies ever!! Ratatouille is incredibly beautiful, healthy, & delicious! Contrary to how it looks, it's actually not difficult to make! Just takes a little patience, and a mandolin slicer. Here's my take on it.
Time: 1 hour, 15 mins
Ingredients:
1 zucchini
1 yellow summer squash
1 Italian eggplant
3 almost ripe Roma tomatoes
1 cup tomato sauce
5 basil leaves (fresh)
1 teaspoon dried oregano
1 teaspoon dried thyme
2 tablespoons olive oil
1 small yellow onion, diced
3 cloves garlic, chopped
salt & pepper to taste
Recipe:
In an oven safe pan, heat 1 tablespoon of olive oil & the diced onions for about 30 seconds-1 minute. Use medium-low heat so it doesnt burn. Then, add the garlic.
Wait 30 seconds before pouring in the tomato sauce. Cook for another 2 minutes then tear up the basil leaves & drop them in.
Use a mandolin to slice the zucchini, squash, eggplant & tomatoes very thin.
Arrange them around the pan that the sauce is in, so that the slices alternate between each vegetable. Continue all the way around the pan, until you run out of slices.
Drizzle the last tablespoon of olive oil over the top. Sprinkle the oregano, thyme, salt & black pepper on top.
Cover with parchment paper & bake on 375 for 45 minutes.
Remove the parchment & bake for another 10 minutes. Enjoy!
Classic flavors, easy to make, and really inexpensive too! My kinda meal! Tried making this for Meatless Monday & I'm really excited to have it be a regular on our list. Here's my take on it.
Time: 40 mins
Ingredients:
Chana Masala:
1 can chickpeas
1 red onion
2 tomatoes (medium sized or 2 Roma tomatoes will work)
Tip: Indian grocery stores sell the batter already mixed in the refrigerator section. Easy peesy! I've had it before and it's not bad!
2 cups dry long grain rice (I used basmati)
1 cup dhal / split peas
1 tablespoon fenugreek seeds
1 teaspoon salt
Recipe:
Cut the red onion & tomatoes in halves, then add them to a small pot & fill with enough water to cover everything. Add about 1 teaspoon of salt. Cover & bring to a boil.
Strain the chickpeas & toss with turmeric, then set them aside.
After 20 minutes, pour the onion, tomatoes & boiling liquid into a food processor & pulse until smooth.
Using about 2 tablespoon of vegetable oil, lightly fry the cumin seeds for a few seconds at the bottom of the pot. Careful not to put the heat too high or they will burn. Add in the other spices as well, stirring to combine. Just allow them to fry for 10-15 seconds.
Pour the mixture back into the pot, stirring it to combine with the spices & oil. Add in the fenugreek leaves, garlic & ginger paste as well.
After about 2 minutes, add the chickpeas & potatoes. Cover & let boil for another 15 minutes or until the potatoes are cooked through.
Serve with rice, naan or dosa!
To make the dosa:
Soak all of the ingredients except the salt in 4 cups water for at least 6 hours (preferably overnight). Then, pulse the mixture with the soaking liquid (add in the salt as well) in a food processor until slightly grainy but mostly smooth. The mixture should be fairly thick.
Next, pour 1/2 cup of the batter in the middle of a non-stick pan. You can pour a little vegetable oil down before to ensure it won't stick.
Wait about 5 seconds before using the bottom of a ladle or large spoon to spread the batter around, in a circular motion. Careful not to press too hard or you'll break the dosa.
After about 30 seconds, you'll notice it start to crisp slightly around the edges. You can add about 1 teaspoon of vegetable oil on it & spread it around with a spatula. Do not flip it.
Add the chana masala in the middle of the dosa, then gently lift up one side over the mixture, then roll it over to completely close the dosa, sealing it with the other side. Use the spatula to lift it off the pan & transfer to a serving dish or plate.
Enjoy! We used a delicious tamarind & date chutney to go with ours.
Weird to try making something you never ate before! What can I say, I'm adventerous! And I'm glad I tried it. Succotash just might be the perfect side dish for Spring (if it ever shows up!)
Time: 40 mins
Ingredients:
1 can lima beans
2 cups corn kernels (I used frozen)
1/2 white onion
3 cloves garlic
1 teaspoon dried thyme
1/3 red onion, diced
2 cups grape tomatoes
1 tablespoon olive oil
1 tablespoon red wine vinegar
Salt & pepper to taste
Recipe:
Pour the lima beans, 1/2 onion, garlic cloves & some salt and pepper into a medium sized pot. Cover with water.
Bring the water to a boil then cover the pot & lower the heat to a simmer. Let simmer for 20 mins.
Once the 20 minutes are over, reserve about 1 cup of the liquid, then strain the rest. Remove the garlic cloves & half onion.
In a large skillet, add the olive oil & the red onion. Sauté for 1 min on medium heat.
Add the tomatoes, thyme & the corn to the skillet.
After about 3 minutes, add the lima beans, red wine vinegar & reserved liquid to the skillet. Add salt & pepper now as well.
Toss the mixture to combine, then remove it from heat & serve!
A gorgeous Spanish dish! Paella seems so intimidating. I tried making it for the first time yesterday and I have to say... it's really not that hard! If you have good quality ingredients & a good paella pan, you're golden. my take on it is a little spicy & packed with incredible flavor.
Time: 45 mins, serves 2
Ingredients:
2-3 cups jumbo shrimp, peeled & deviened, tail on
2-3 cups cooked mussels (can use uncooked but it's a pain to wash & takes longer to cook)
1 cup paella rice (can substitute any short grain rice)
1/2 onion, diced
3 cloves garlic, minced
1 can Rotel diced tomatoes & green chilies (this is where the spice comes in, if you don't want it spicy you can use plain canned diced tomatoes)
1 cup fresh parsley
1 teaspoon saffron threads
1/2 cup sweet green peas
3 cups chicken stock (can use 1 chicken boullion cube with 3 cups of water)
1 teaspoon smoked paprika
salt & pepper to taste
1.5 tablespoons safflower oil (or any high-heat oil)
1/2 lemon
Recipe:
Tip: The best way to do this is to get a Paella pan. To serve 2 people, I bought a 13.5 inch paella pan from Amazon. Worked wonders!
Heat the oil & onion in the paella pan on medium heat. After 30 seconds, add the garlic, then give it another 30 seconds before adding the tomatoes.
Pour in the paella rice & toss to combine.
Sprinkle on the smoked paprika & the saffron, then add the chicken stock. Bring the mixture to a boil, then cover. I used my pizza stone to cover the paella pan because I don't have a large enough pan cover. Reduce the heat to let the mixture simmer while it's covered.
After about 20 minutes, uncover the pan & use a spatula to stir. You may notice some rice sticking to the bottom of the pan, that's okay. Paella should have a nice crust at the bottom. Not a thick crust, but a nice crunchy layer.
Add in the seafood and green peas then cover to allow it to cook for 5 more minutes. Keep the heat on medium.
Once the seafood is cooked, add in the parsley & lemon wedges & serve! Squeezing the lemon juice over the paella before eating it gives it a wonderful fresh taste!
An incredibly easy wing sauce that will make you never default to Buffalo again! Most of the work is done in the food processor (don't you just love those kinds of recipes?) and then slow simmered in a sauce pan. Enjoy!
Time: 30 mins
Ingredients:
2 green mangoes, chopped
1 Habanero pepper, sliced with seeds removed
3 cloves garlic
3 tablespoons brown sugar
1 teaspoon salt
1 cup apple cider vinegar
Recipe:
Place the mango, Habanero & garlic cloves in a food processor & pulse until finely ground
Pour the mixture in a small sauce pan on low heat, stirring to avoid burning.
After about 1 minute, add the brown sugar.
Once the brown sugar melts, keep stirring the mixture occasionally for 10 minutes so the garlic cooks.
Add the apple cider vinegar & salt. Let the sauce simmer for another 10 minutes, stir if needed.
Toss hot wings in the sauce using a large bowl, enjoy!
First time trying cauliflower pizza & I'm making it eggless. I know, I know "over achiever". But on Mondays, I go veggie, including giving up eggs. So this will have to work. Actually, it did.
Time: 1.5 hours
Ingredients:
1 head cauliflower
1 can chickpeas
1/4 cup flour (I used all purpose but you can use a gluten free flour of your choice
2 teaspoons olive oil
1 teaspoon dried oregano
1 teaspoon dried basil
salt & pepper to taste
toppings of your choice
Recipe:
Preheat oven to 425, put your pizza stone in there to heat up.
Strain & rinse the can of chickpeas.
Put the cauliflower florets into a large food processor, pulse until fine grains form.
Boil the cauliflower then strain it. Once it's cool enough to touch, pour it into a kitchen towel or cheese cloth, and squeeze the excess water out. Then return the cauliflower to the food processor.
Add the chickpeas, olive oil, basil, oregano, salt & pepper to the food processor. Pulse to combine & grind the chickpeas.
After the mixture is formed, add your dry flour to bind it all together. Pulse to combine.
Remove your hot pizza stone from the oven & spray cooking spray all over it. Pour the cauliflower mixture in the middle of it. Spread it out with a spatula (or just use your hands, be careful not to touch the hot pizza stone directly). Spread it to about 1/2 inch thick.
Place the crust in the oven & bake for 20 minutes.
Optional step for a crispier crust: remove the crust, brush it with 1 tablespoon of an oil of your choice. You can use olive oil, or an infused oil such as garlic or truffle.
Place it back in the oven for another 10-15 minutes before removing it to add toppings. Crust should be golden.
Once your toppings are on, bake the pizza for another 10 mins or until the cheese is melted. Enjoy!
A classy, sophisticated side dish that is so easy to make! Here's my take on it.
Time: 1 hour
Ingredients:
4 rustic potatoes
5 tablespoons butter, melted
3 cloves garlic, crushed
1 cup panko breadcrumbs
1/2 cup grated Parmesan cheese
1 teaspoon smoked paprika
salt & pepper to taste
Cooking oil spray for the pan
Recipe :
Preheat oven to 425. Cover a glass Pyrex dish with foil & spray to coat with cooking oil.
Put the garlic cloves inside the butter so they begin to infuse.
Wash & dry potatoes, then take them one by one to cut on a cutting board. You're going to want to lay 2 chopsticks on either side of the potato to avoid cutting straight through the bottom (so the potatoes fan out like the picture above).
Cut about 1/4 inch thick slices through the entire potato (until your knife hits the chopsticks). Do the same for all 4 potatoes.
Place the potatoes into a bowl of cold water as they are finished being cut. This will wash out some of the starch from inside the potato before you bake it. Make sure they are dry before baking, though.
Arrange the potatoes in the Pyrex dish & fan them out slightly with your hands. Sprinkle salt & black pepper as desired.
Brush the garlic butter mixture on top of each potato. Cover with aluminum foil & bake for 35 mins.
Take the potatoes out of the oven, uncover them, then brush more of the butter mixture on them.
Sprinkle the breadcrumb mixture on top of each potato, trying to get some inside the little slits.
Brush with more butter & bake again UNCOVERED for another 10-15 minutes or until the potatoes are golden, cooked through.
Starting off the year right with some green! Pea soup with fresh ginger, spinach & fresh herbs. It's an easy way to have your vegetables, without a cold salad!
Time: 30 mins
Ingredients:
2 cups frozen peas (can use fresh/canned)
1 vegetable boullion cube
2 cups water
1 cup spinach
1 teaspoon fresh rosemary
1 large sage leaf, torn into smaller pieces
1 small white onion
1 teaspoon fresh garlic, minced
1 inch fresh ginger, minced
salt & pepper to taste
1 tablespoon vegetable oil
Recipe:
Dice the onion & place it in a medium sauce pan with the vegetable oil. Use medium-low heat.
Add the garlic, ginger, rosemary, sage & boullion cube into the pot. Stir to combine & stir every couple minutes until the boullion cube is melted.
Add the peas, sauté for about 10 minutes, stirring occasionally.
Add the water, salt & pepper. Bring to a boil.
After about 10 minutes, turn the stove off & add in the spinach. Stir until the spinach is wilted.
Pour the soup mixture into a food processor & pulse until the mixture is smooth.
MmmmMmm!! This Guyanese classic will make your whole house smell like sweetened coconut! So flaky, soft, slightly sweet, simply delicious. My recipe caters to certain allergies - it is eggless & dairy free. Enjoy!
Time: 1.5 hours
Ingredients:
Dough:
3 cups all purpose flour
1.5 teaspoons salt
1/4 cup warm water
1 packet yeast
1 cup warm Lactaid (can use milk if you want)
1 teaspoon ground cinnamon
1 tablespoon apple sauce (this replaces the egg)
1/4 cup shortening
1/4 cup + 1 teaspoon white sugar
1 tablespoon I Can't Believe it's not Butter, melted
Filling:
2 cups dried coconut flakes
1/4 cup brown sugar
1 teaspoon ground cinnamon
1 teaspoon vanilla extract
2-3 spoons water
5-6 drops red food coloring
Recipe:
Disolve the yeast in 1/4 cup water & the teaspoon white sugar.
Place it in a dark warm area to activate for 10 minutes (I put mine in the microwave with it turned off).
In a large bowl, combine the flour, 1/4 cup white sugar, salt, & cinnamon. Once the flour mixture is combined, cut the shortening in (until no chunks remain).
After the yeast activates, add the warm Lactaid, yeast mixture & applesauce to the flour. Knead to form a dough.
Place the dough in a greased basin (I used vegetable oil to grease mine) covered with foil for 1 hour. Dough will double in size.
While the dough is rising, you can make the filling. Combine all of the filling ingredients and mix well so the food coloring is absorbed by all of the coconut. You may need to add more water, you don't want the filling to be very dry.
Once the hour is up & the dough has risen, punch it in the middle so the air comes out. Then, split the dough into 2 equal parts (you'll be making 2 rolls).
Use a rolling pin & a light dusting of flour to roll out each dough to a rectangle.
Scoop half of the filling into each rectangle & spread to distribute evenly. Make sure the filling is all around the edges so you get a really good design!
Bake on 350 for 10 minutes, then brush on some of your melted I Can't Believe it's not Butter, and bake again for another 5-10 minutes until golden brown.
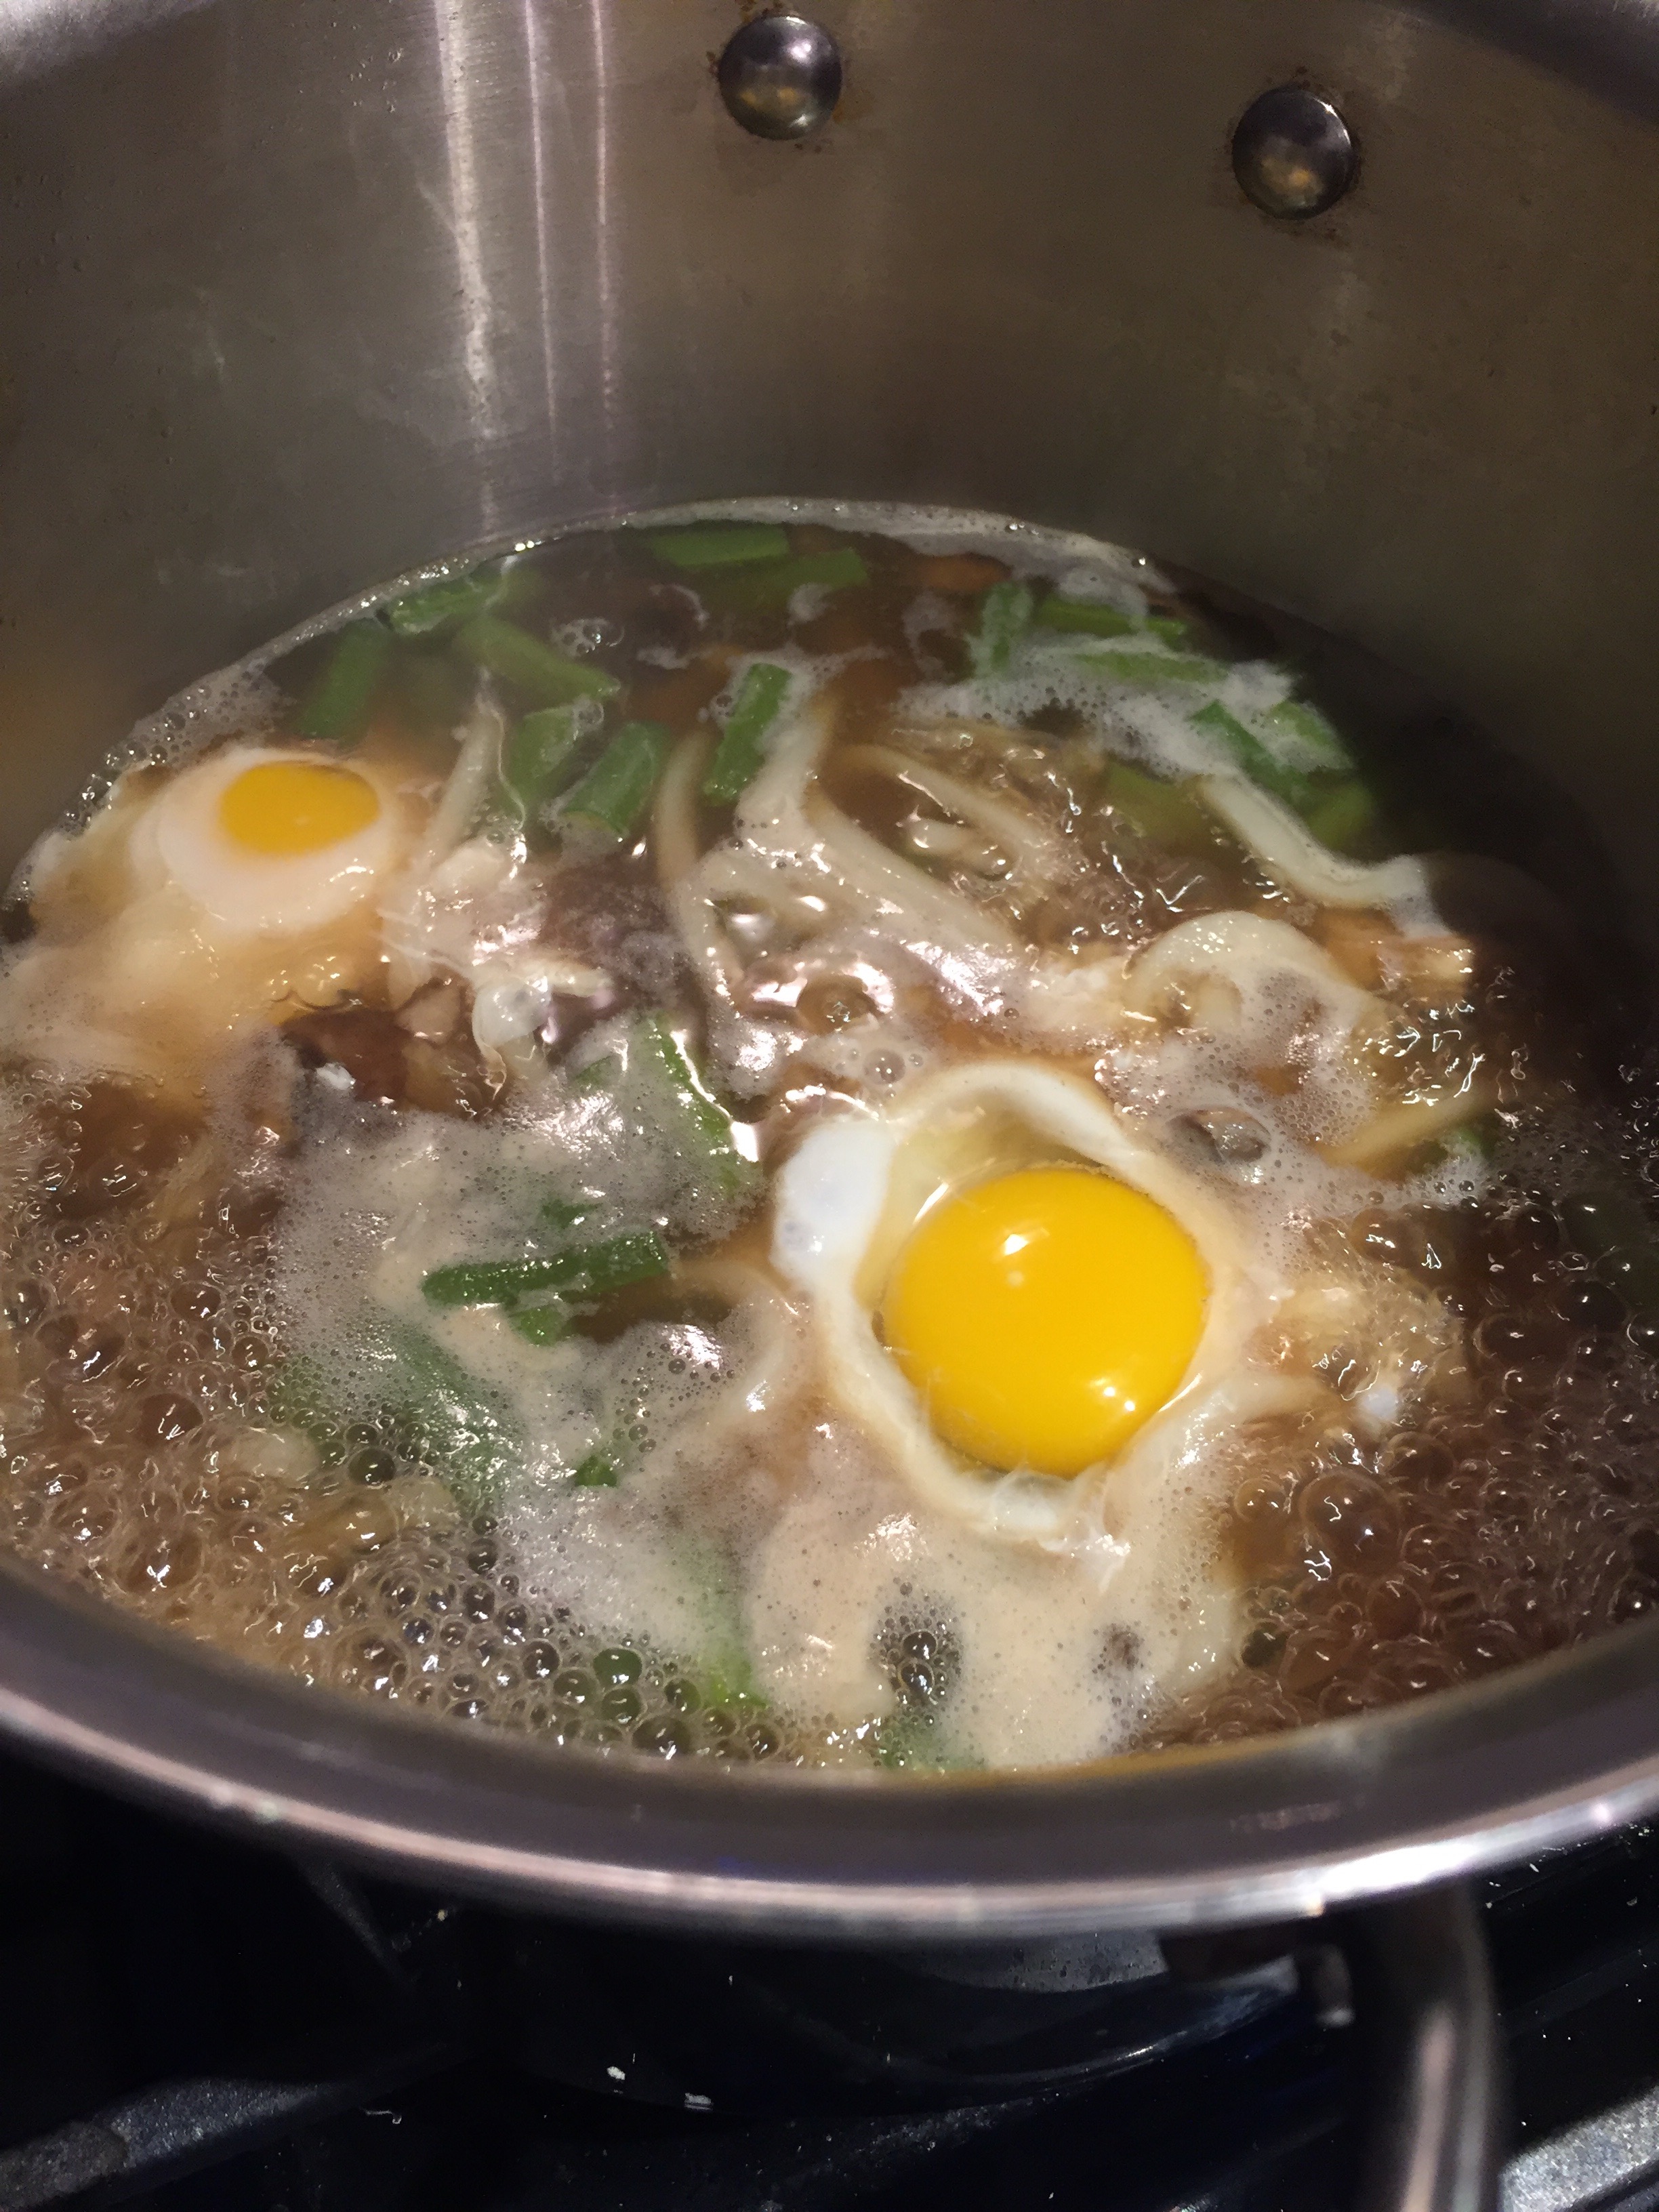
Winter is for yummy warm hearty soups! You don't have to go out in the cold to enjoy a nice bowl of Udon. Here's an easy vegetarian homemade recipe that will be worth your while.
Time: 2 hours (most of this is the mushrooms soaking)
Ingredients:
1 pack udon noodles
1 pack shiitake mushrooms (can be sliced or not)
water
green onion
soy sauce
salt & pepper to taste
egg if you'd like to add it to your udon
Recipe:
First, wash the mushrooms & then place them in a tall Tupperware / container. Add water to cover the mushrooms (and about 1/2 cup more)
Place another Tupperware / container pressing on top of the mushrooms to keep them from floating. Cover with clear wrap & refrigerate for at least 1.5 hours (overnight is better).
Next, make the udon according to the package (pretty much add them to boiling water then straining them & putting in an ice bath so they don't over cook).
In a medium sauce pan, add the broth along the mushrooms (you can slice them at this point if they aren't sliced).
Bring the broth to a boil, add in a couple splashes of soy sauce (depending on how much you like, I used about 1.5 teaspoons).
Add in the udon noodles and pepper if you like.
Crack an egg one by one into the pot so it poaches in the liquid (if you like).
Omg. Yep, that's the reaction I had too. I started out creating a brownie cake for my brother because he loves brownies. Then I had an idea to add bourbon, because he loves bourbon (who doesn't?). Then I decided the brownie cake looked too plain so I made my own icing... and you know the rest. So easy, so fabulous.
Time: 1 hour
Ingredients:
1 box brownie mix (I used Ghirardelli dark chocolate)
1/4 cup olive oil
1/3 cup vegetable oil
1 tablespoon bourbon for the cake mix & another for the icing (I used Angels Envy, use your favorite)
1/2 cup confectioners sugar
1 teaspoon maple syrup
1 teaspoon cinnamon
2 splashes of water
1/4 cup crushed pecans
Recipe:
In a large mixing bowl, whisk together the brownie mix, 1 tablespoon bourbon, olive oil & vegetable oil. The recipe on the brownie box will most likely call for 1 egg, I didn't want to use any eggs so I adjusted with more vegetable oil instead. The above measurements work!)
Pour the brownie mix into a round cake pan (or honestly whatever shape you want!). Bake 2-3 minutes less than the instructions (mine was 325 for 40 minutes). The reason I bake it a little less is so the cake is chewy / fudgy. You can test with a toothpick.
While the cake is baking, mix 1/4 cup of the confectioners sugar with the remaining tablespoon of bourbon, cinnamon & a splash of water. Once the icing is combined, add in crushed pecans. I bought the pecans for baking because they're already crushed, you can use any kind you have/like.
Once you stir in the pecans, the mixture will become closer to a spread than an icing.
After the brownie cake bakes & cools, run a knife or spatula around the edges to loosen it up, then turn it over on a serving tray/plate. Now it's ready for icing!
Spread the pecan mixture on top of the brownie cake evenly.
Mix the remaining confectioners sugar with another splash of water to make white icing. A little water goes a long way! Tip: I mixed it in a measuring cup so there's a spout for pouring)
Once the icing is ready, hold the measuring cup about 6 inches above the brownie cake & drizzle in whatever design you like! I did zig zags all over my cake & then swirled the remaining on top.
Let the icing cool for about 20 minutes so it hardens before you cut the cake. Enjoy!
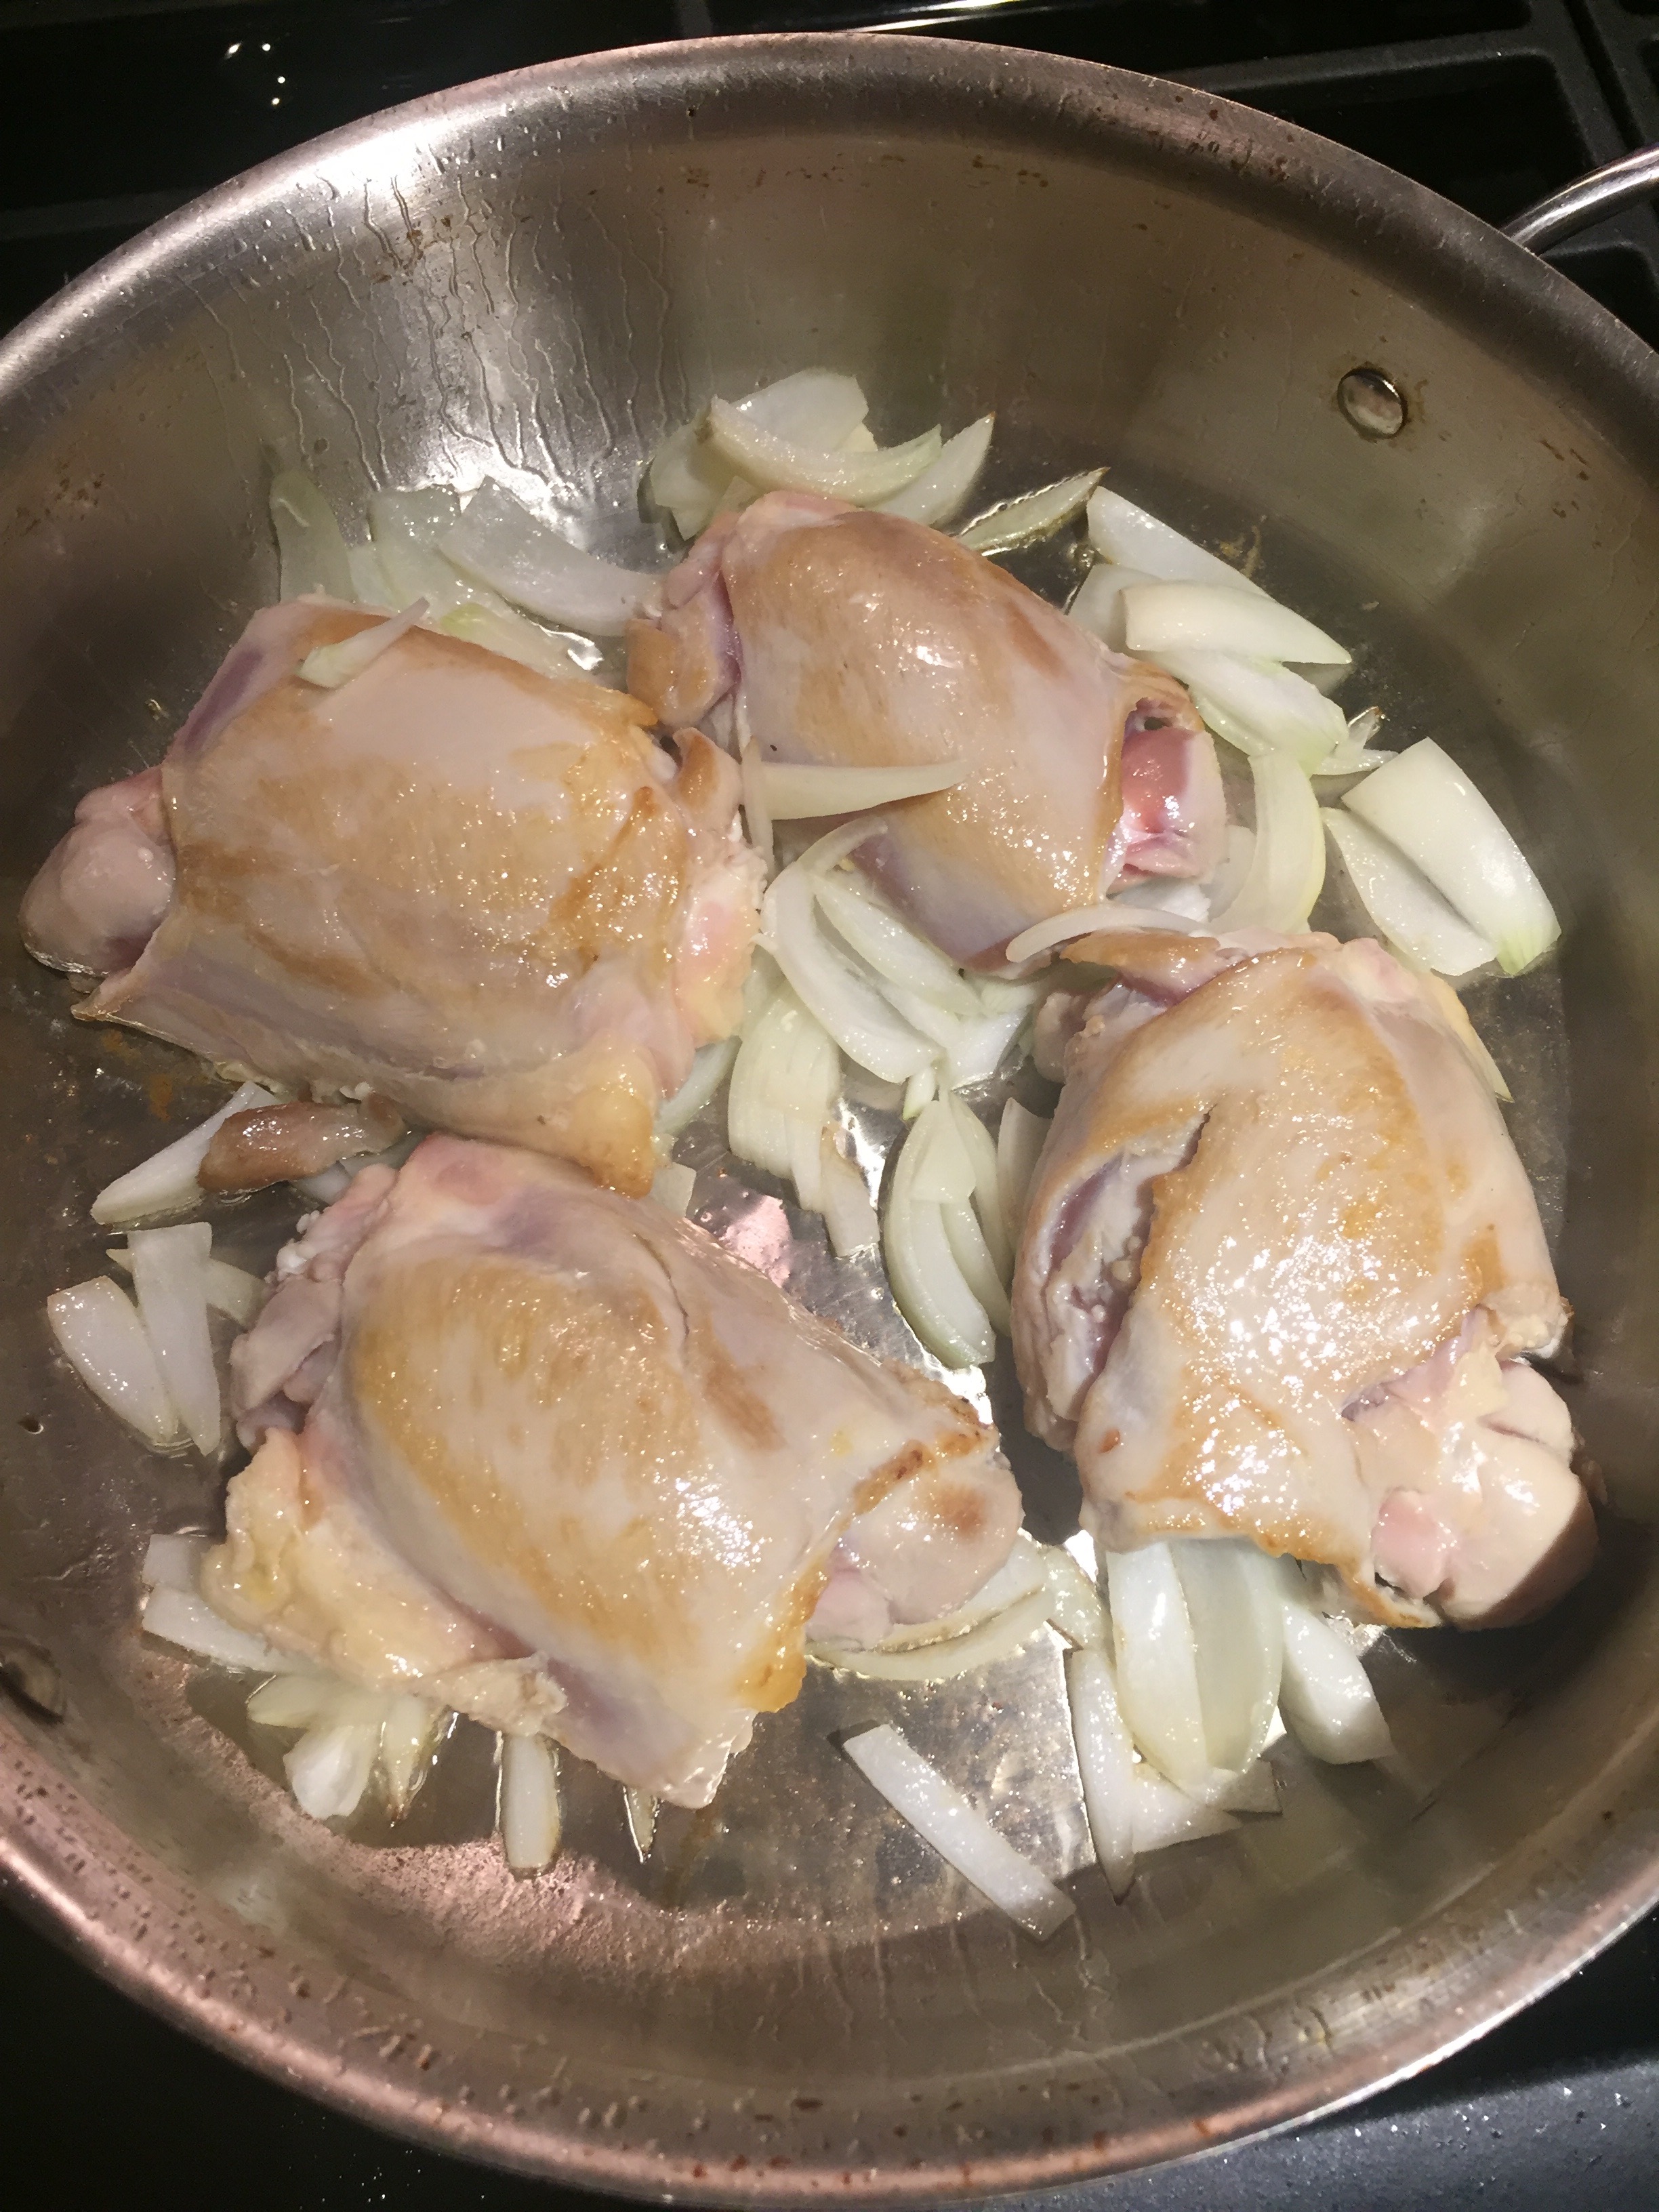
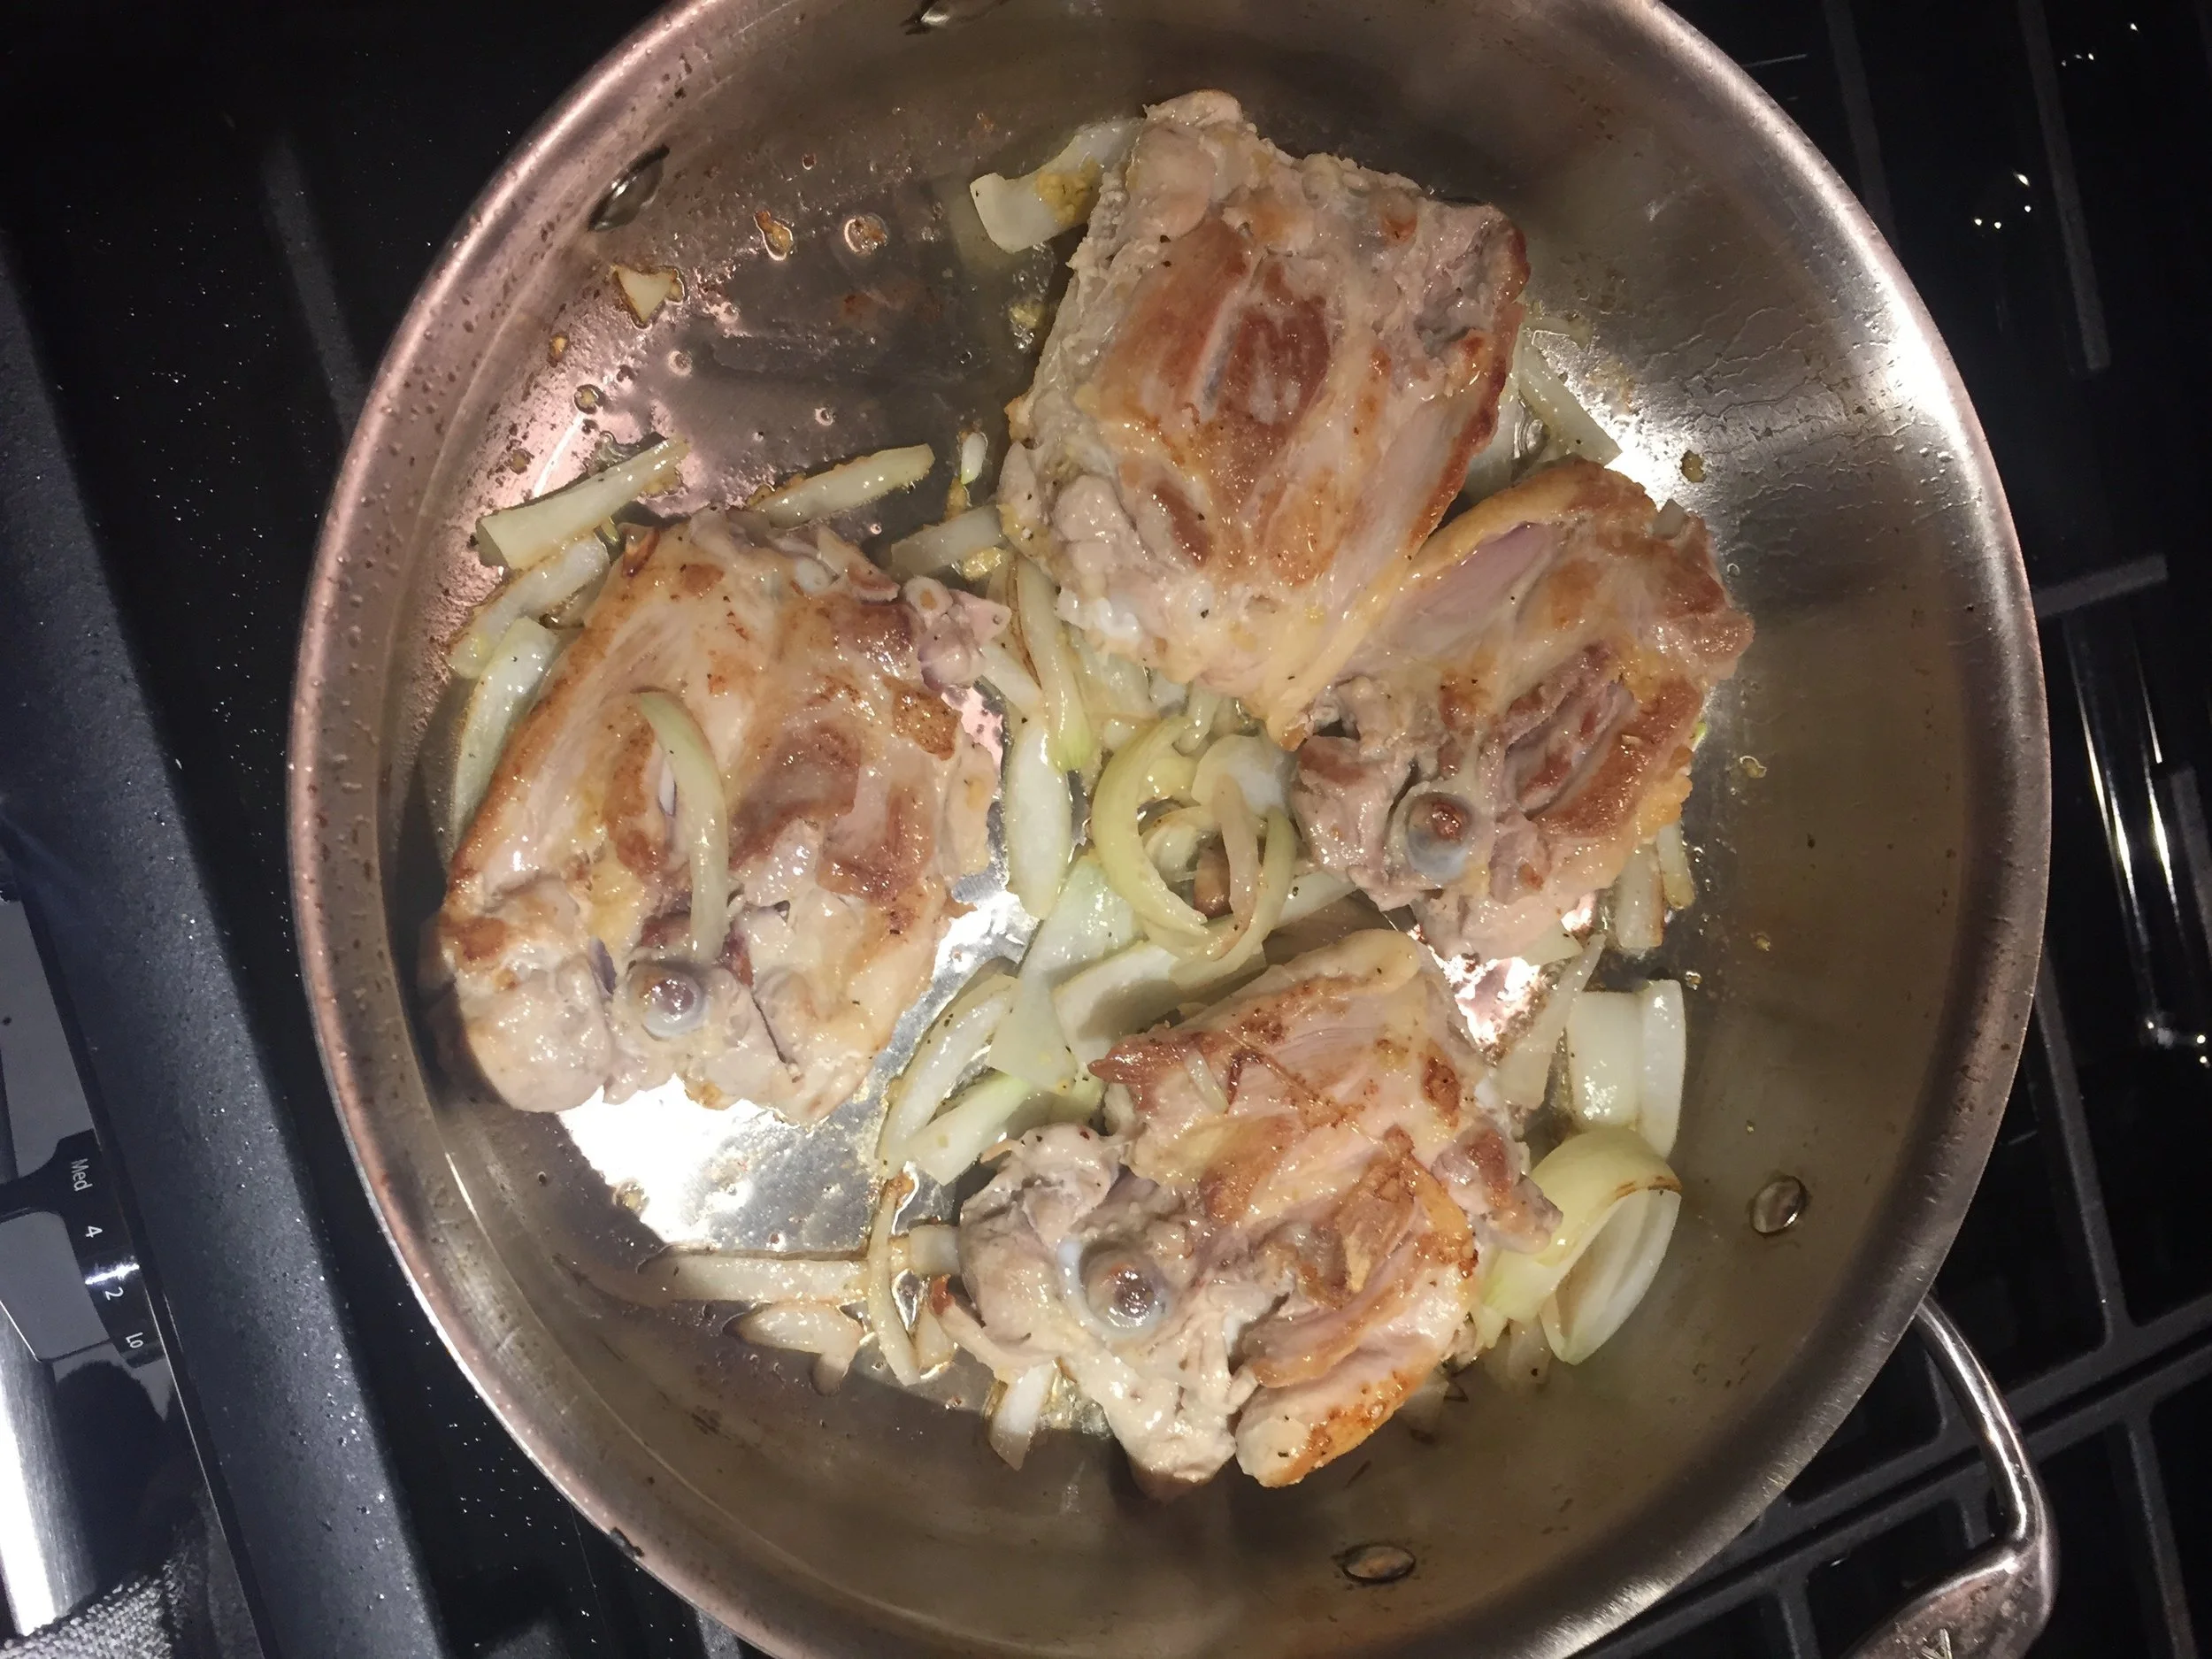
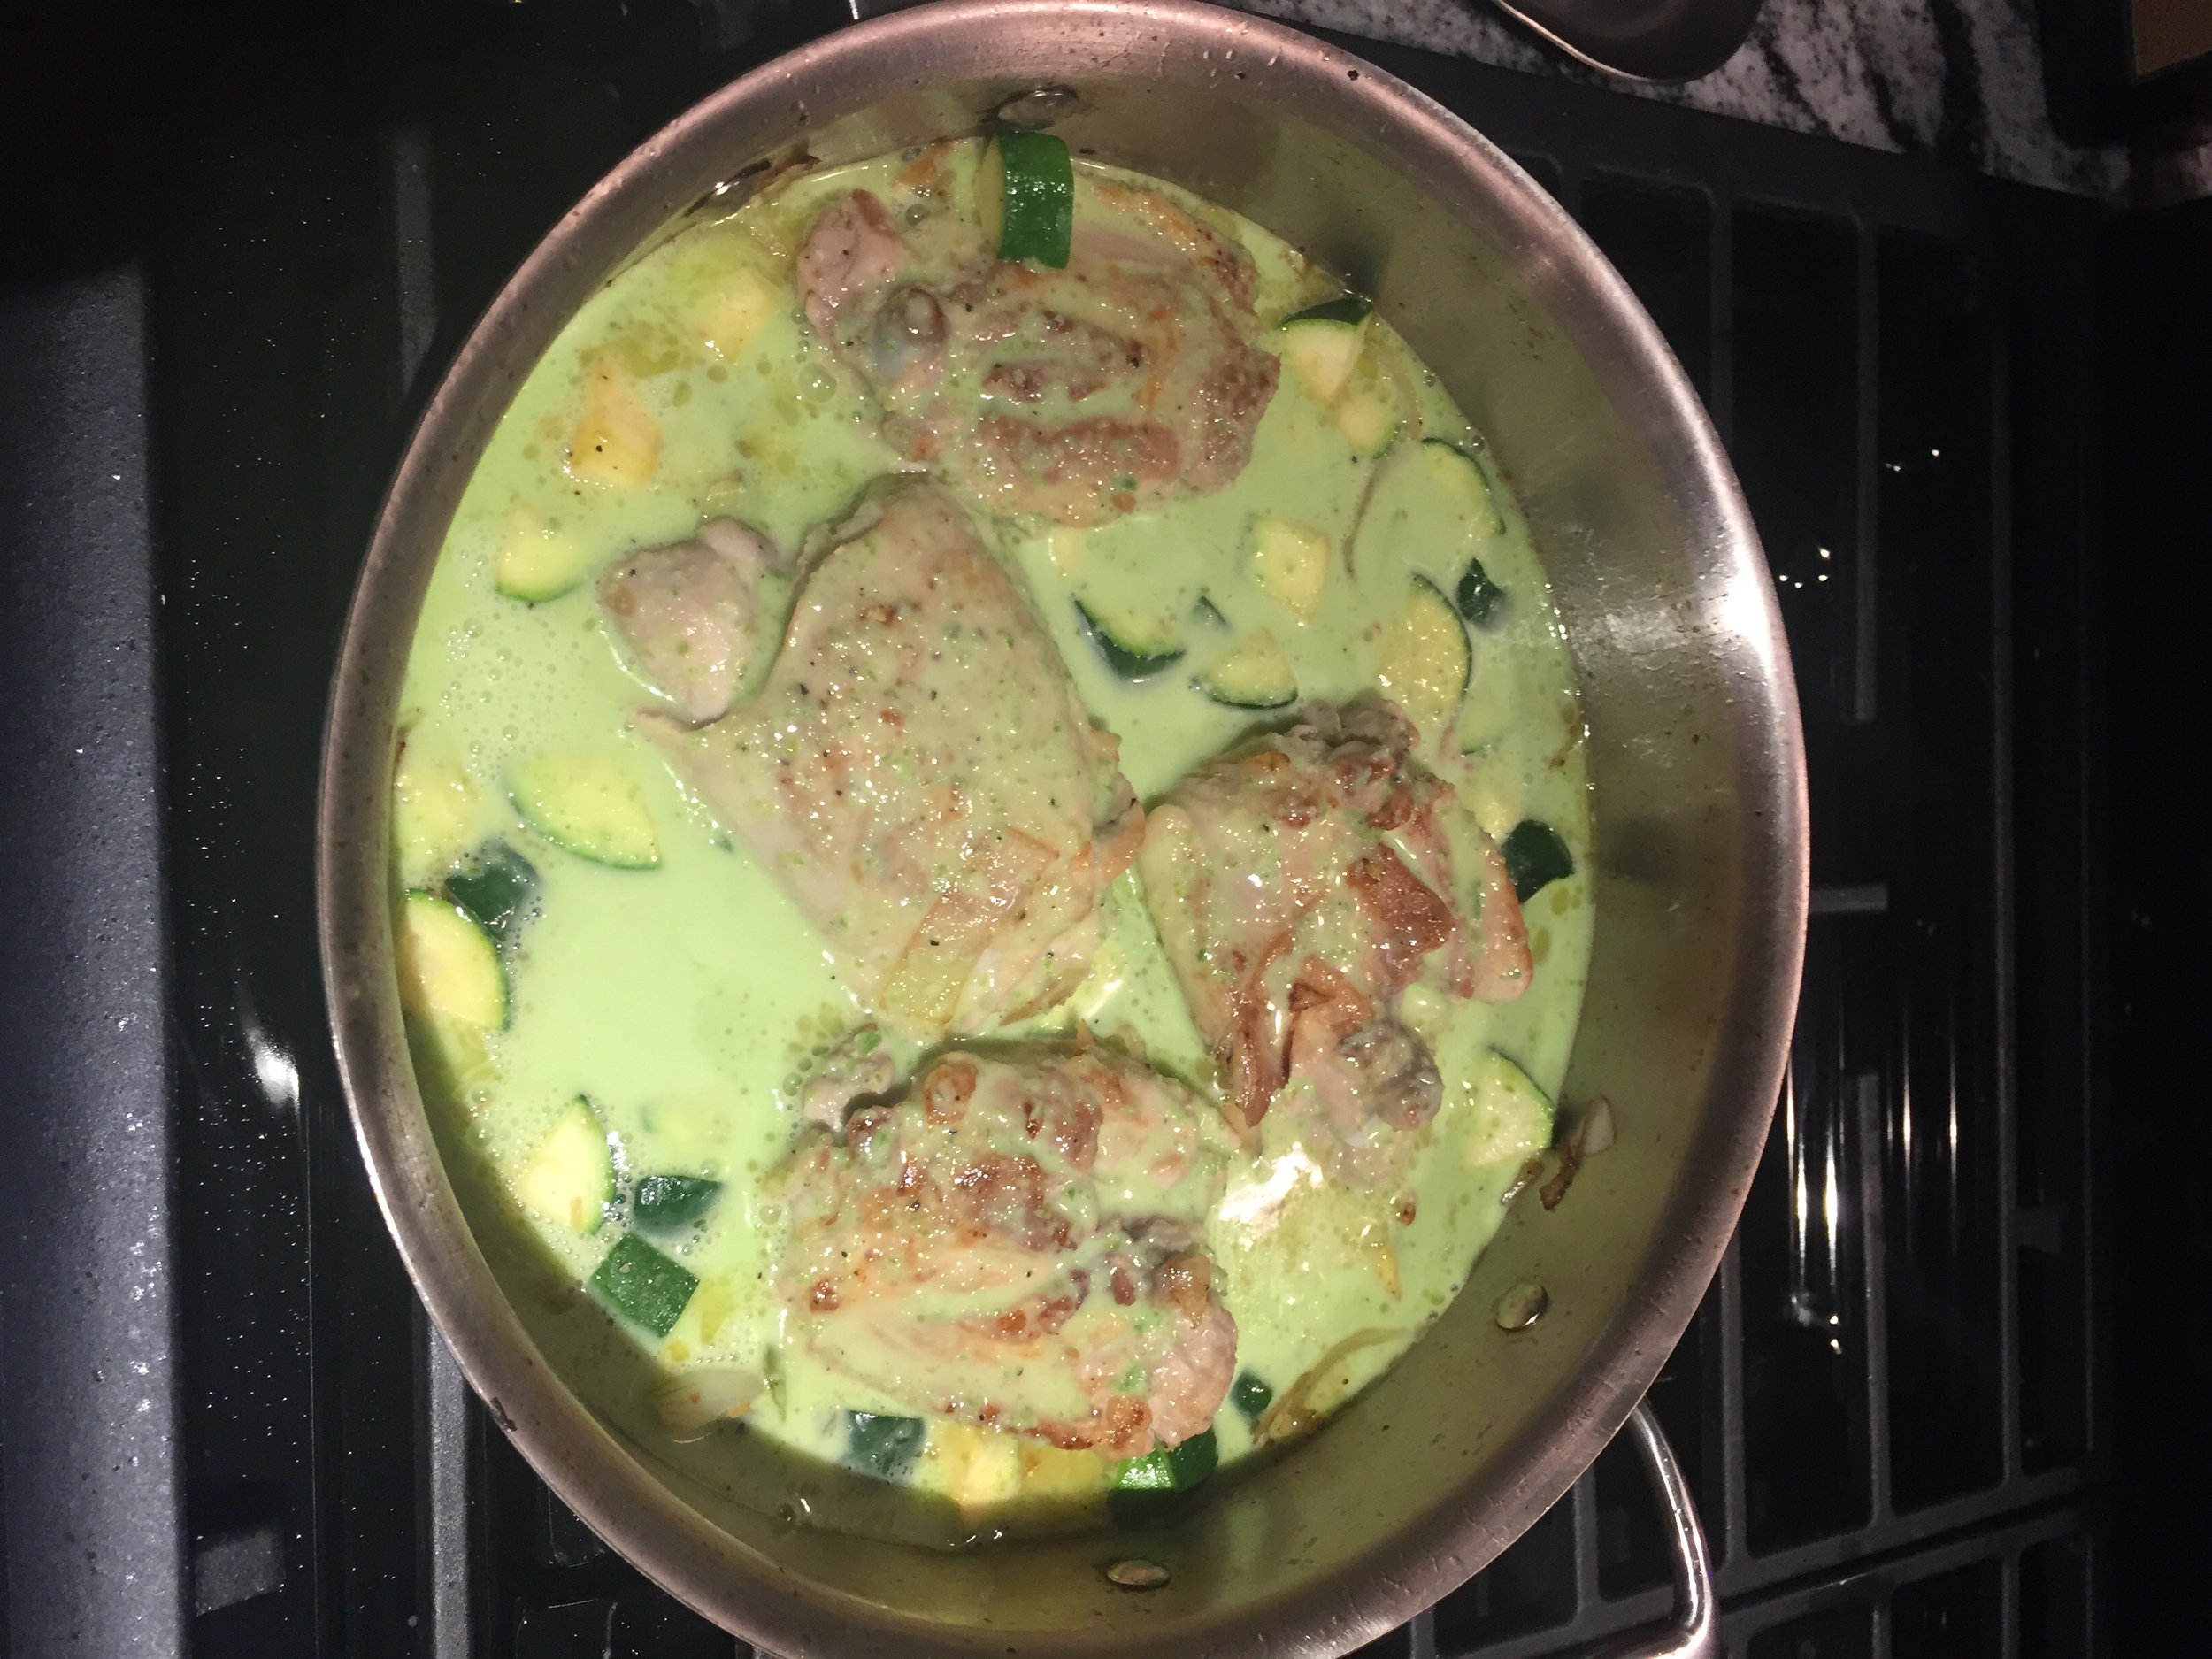
Ok it's been getting cold fast here in the tri-state area & to me that means give your food a little heat! Chicken thighs simmered in a creamy sauce of pulsed jalapeño peppers & coconut milk. Creamy with a kick!
Time: 1 hour
Ingredients:
1 pack chicken thighs, skinless (doesn't matter if it's boneless or not)
3-4 jalapeño peppers
1 can coconut milk
1/2 yellow onion
2-3 cloves garlic
salt & pepper to taste
1 tablespoon olive oil
Recipe:
In a large skillet, brown the chicken thighs in the olive oil for ~2-3 mins before adding the onion & garlic. Lower the heat so it stays warm but doesn't burn.
Slice open each jalapeño pepper, remove seeds.
Use a blender or food processor to grind the jalapeño, coconut milk, salt & pepper unless smooth.
If you'd like, dice a zucchini or any other type of vegetable & add it to the chicken, sauté for a minute.
Pour the sauce over the chicken thighs & raise the heat to medium, cover the pan.
Let simmer for about 10-15 minutes or until the chicken is tender. Garnish with fresh jalapeño slices if you like it spicy!
Carbless heaven in 15 minutes!! Grilled portobello mushrooms seasoned to perfection & topped with tomatoes, spinach & olives! Top it with whatever you want - the possibilities are endless!!
Time: 15 minutes
Ingredients:
4 portobello mushrooms, stems removed
2-3 medium sized tomatoes, diced
1-2 handfuls of baby spinach, chopped
5-7 kalamata olives, pitted
2 tablespoons olive oil
1 teaspoon dried thyme
1 tablespoon of goat cheese
salt & pepper
Recipe:
Rinse the mushrooms & pat them dry. Lay them on a grill mat, tops down so the mushrooms form a bowl shape (to fill with the toppings).
Drizzle 1 tablesooon of the olive oil over the mushrooms.
Grill on medium-high heat for ~7 minutes.
Mix the diced tomatoes, chopped baby spinach, kalamata olives, the other tablespoon of olive oil, salt & pepper in a bowl. Add in the goat cheese, crumbled.
Remove the mushrooms from the grill & drain any excess liquid.
Top the mushrooms with the tomato mixture - add more crumbled goat cheese if desired. Enjoy!
Fall is here!! Time for some fall recipes. Squash in particular :) When it's still warm enough to fire up the grill, try these stuffed grilled acorn squash!! Fill them with whatever you like, they are so easy & delicious to make.
Time: 20 minutes
Ingredients:
1 medium acorn squash
1 tablespoon olive oil
salt
filling of your choice
Recipe:
Cut the acorn squash in half long ways, scoop out the seeds. Shave off a small piece of the round end of each squash so that the sides will stand up without rolling.
Drizzle with olive oil & grill flesh-side down on medium heat for about 8-10 minutes or until tender. I used a grill mat for easier clean up!
While the squash is grilling, you can prepare your stuffing mixture. I used a mixture of farro, kale, roasted butternut squash, & pecans, tossed in a pomegranate balsamic vinaigrette.
Remove the squash from the grill & flip over so the flesh side is now up.
I know I know.. it's not red like normal kimchi. But guess what? It's really yummy. And you have a version of kimchi in 20 minutes. So try it.
Time: 20 mins
Ingredients:
1/2 head of cabbage, chopped
1/4 cup water
1 teaspoon salt
1 teaspon sugar
1 teaspoon fresh chopped ginger
1 teaspoon sesame oil
1 teaspoon hot pepper sauce (I used Guyanese pepper sauce made with scotch bonnets)
2 tablespoons white vinegar
1 teaspoon minced garlic
Recipe:
In a small pot, cook the cabbage & minced garlic in the water. It may seem like too little water for the cabbage, but remember cabbage already has a high water content so don't add more than 1/4 cup! Let it cook for ~4-5 minutes.
Take the heat off & move the pot off the burner. You can also transfer the cabbage at this time to a large bowl.
Add all of the remaining ingredients to the cabbage & mix to combine.
Refrigerate the kimchi & enjoy later or add to fried rice, fries, anything you want!
What a delicious start to Fall soup meals!! There's nothing better than a creamy healthy bowl of Butternut squash soup infused with fresh ginger, chili powder & sage!
Time: 1 hour
Ingredients:
1 medium sized butternut squash
1/2 cup freshly chopped ginger
1/4 cup chopped onion
1 tablespoon minced garlic
1 tablespoon chili powder
2-3 Sage leaves (sage is pretty strong so you don't need a lot)
Salt & pepper to taste
water as needed
1 tablesooon vegetable oil
Recipe:
Peel & chop the butternut squash into small cubes.
Add the vegetable oil & onions to a large pot on medium heat. Let simmer until the onions are transparent, then add the ginger & garlic. Sauté for about 1-2 minutes.
Add the butternut squash, sage, & the chili powder (can add the salt & pepper at this time too). Stir to combine.
Once the squash is seasoned, add enough water to completely cover the top of the squash. You should raise the heat at this time to high so it boils.
Cover & let the squash boil for about 15-20 minutes (stirring & adding water as needed occasionally).
Once the squash is fork-tender, you can use an immersion blender to smooth it out.
You can test for salt at this time. Add fresh sage to garnish & serve!